Full project: We as a class worked on these project to develop a variety of skills and learn new concepts. These were, heat, thermodynamics, day lighting techniques, and alternate energy. We had 6 parts in total throughout the duration of this project. We completed our solar water heaters, solar house design, materials testing labs, wind turbine designs( Vertical and Horizontal), cold frame designs , and our north window plans.
Properties of Heat: Pre-projects we took time to understand what heat was and how it behaved. This required us also to review on the structure of atoms and molecules. We learned about the three parts of an Atom, the nucleus, the protons, and the electrons. Protons have a positive charge, electrons have a negative charge, and neutrons have a neutral charge. Heat in an atom is just a measurement of how much energy it carries. Another thing about heat, there is only heat. Cold does not really exist, It is simply just the absence of Heat being there. "Cold" is just your bodies feeling to heat being taken away.
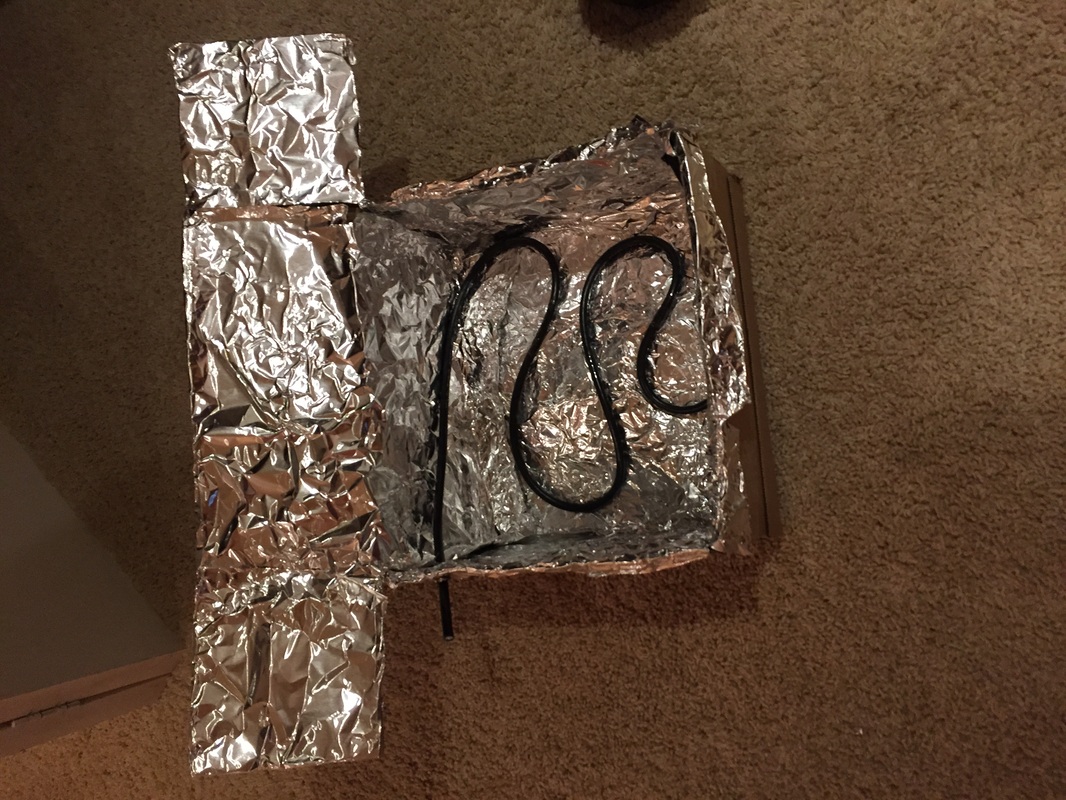
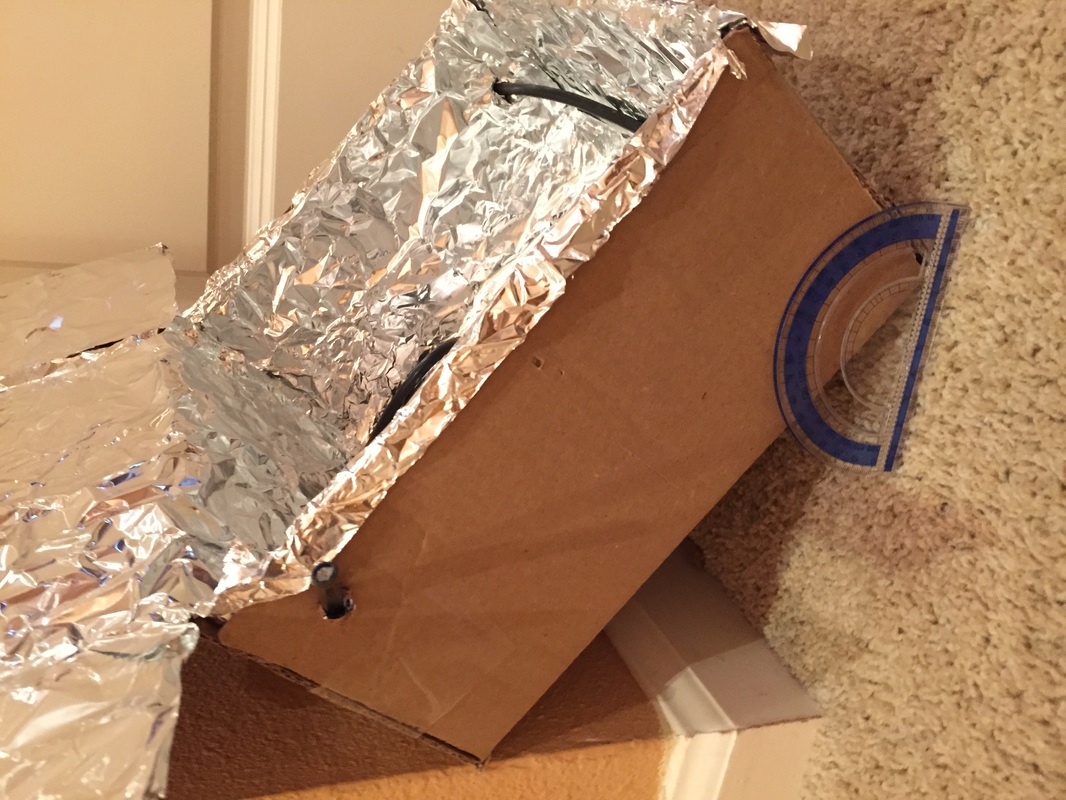
Solar Water Heater: Our solar water heater project was the on we started off with, our job was to construct a heater using a box, copper pipe, aluminum foil, and anything else we could think of to heat the water running through it. Some groups used more creative ideas, but my group stuck with the basics.
We used:
-1 shoe box
-duct tape
- aluminum foil
-saran wrap
-1 water bottle
-1 snap tight lunch container
To construct the solar water heater we took our box, lined it with aluminum foil, then ran a tube in a snaking formation through the inside. We made sure to keep as much tube on the inside as possible. This generated the most heat. Afterward we covered the top of the box in saran wrap, this kept our heat in the air inside the box. Finally we added a piece of cardboard that we covered in aluminum foil to the op of our box. Its purpose was to reflect more light into the box.
Properties of Heat: Pre-projects we took time to understand what heat was and how it behaved. This required us also to review on the structure of atoms and molecules. We learned about the three parts of an Atom, the nucleus, the protons, and the electrons. Protons have a positive charge, electrons have a negative charge, and neutrons have a neutral charge. Heat in an atom is just a measurement of how much energy it carries. Another thing about heat, there is only heat. Cold does not really exist, It is simply just the absence of Heat being there. "Cold" is just your bodies feeling to heat being taken away.
Solar Water Heater: Our solar water heater project was the on we started off with, our job was to construct a heater using a box, copper pipe, aluminum foil, and anything else we could think of to heat the water running through it. Some groups used more creative ideas, but my group stuck with the basics.
We used:
-1 shoe box
-duct tape
- aluminum foil
-saran wrap
-1 water bottle
-1 snap tight lunch container
To construct the solar water heater we took our box, lined it with aluminum foil, then ran a tube in a snaking formation through the inside. We made sure to keep as much tube on the inside as possible. This generated the most heat. Afterward we covered the top of the box in saran wrap, this kept our heat in the air inside the box. Finally we added a piece of cardboard that we covered in aluminum foil to the op of our box. Its purpose was to reflect more light into the box.
The way to gain heat from this design was very simple. Start with a water bottle, put a hole in the bottom. After, link a hose from that bottle into the heater. Let the water run through and out back into another bottle you have waiting. Bring the water from the bottom back to the top, repeat until you have the results you want. In the end we only increased our total heat by 1 to 2 degrees. Taking into consideration though, we lost about 50% of our water to spills. This greatly decreased our heat increase.
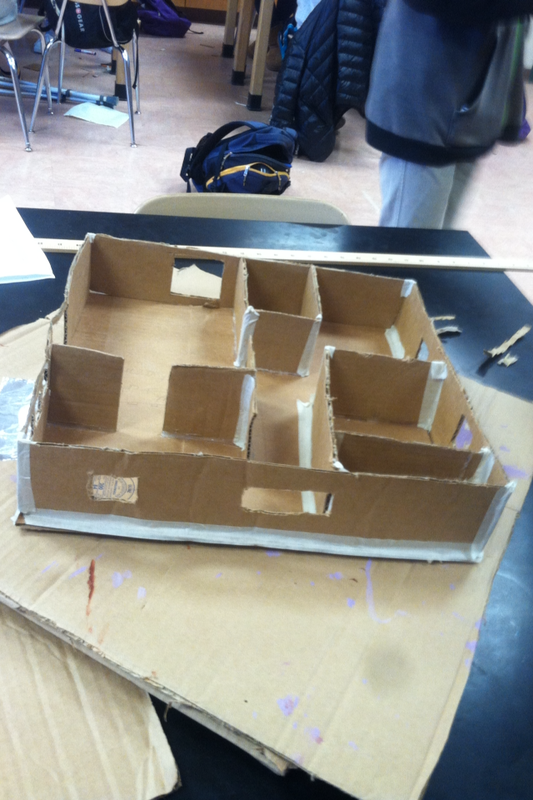
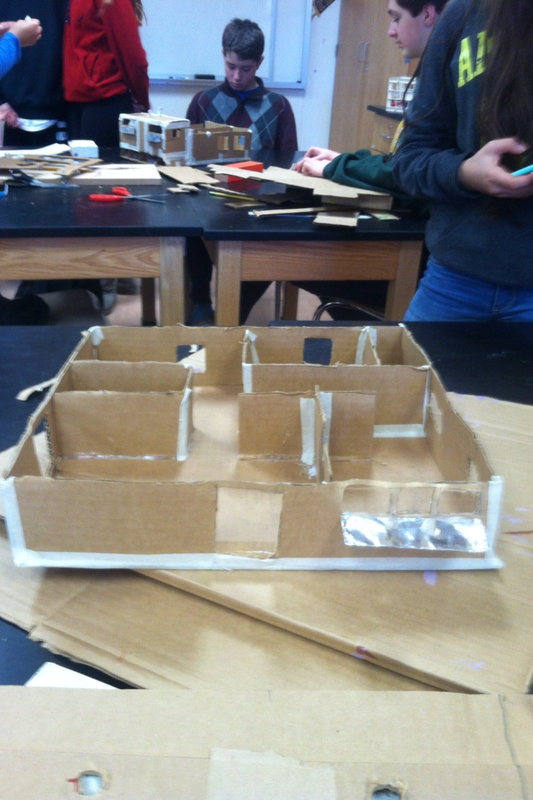
Solar House Design: For the second part of our large project we designed a solar house. This house was supposed to be the most light efficient in every way. That meant allowing light to travel through the house without using electricity well at all times of the day.
For this project we only used a few materials. These were cardboard, hot glue, aluminum foil, and duct tape.
For this project we only used a few materials. These were cardboard, hot glue, aluminum foil, and duct tape.
Sun angles:
Previous to this project we learned about sun angles during the day, how they change and what degree they sit at in the sky. We also learned about how they change as seasons change. Here is a graph to represent the data collected:
Previous to this project we learned about sun angles during the day, how they change and what degree they sit at in the sky. We also learned about how they change as seasons change. Here is a graph to represent the data collected:

In our design we used most of the strategy's for getting in light. In our design we included:
-A clerestory window: A window placed above eye level designed to allow light to enter a room from higher up.
-A light shelf: A shelf placed perpendicular on the base of a window (on the inside or out) It reflects light coming in at the base of a window onto the ceiling on the inside of the building and refracts across the whole room.
-skylight: Window placed in the ceiling to let light in.
-solar tube: A reflective tube that takes light from your roof and carry's it down the tube emitting it from your ceiling like a skylight but more spread out due to a light dispersing glass piece at the end of it.
Our design was overall decent. It did very well in certain rooms, but not in others. It did very well at certain times of the day, but not at others. This may have been due to our solar tubes being made out ineffective materials. If we had to build the house I would change the walls to have more windows and more open hallways/space.
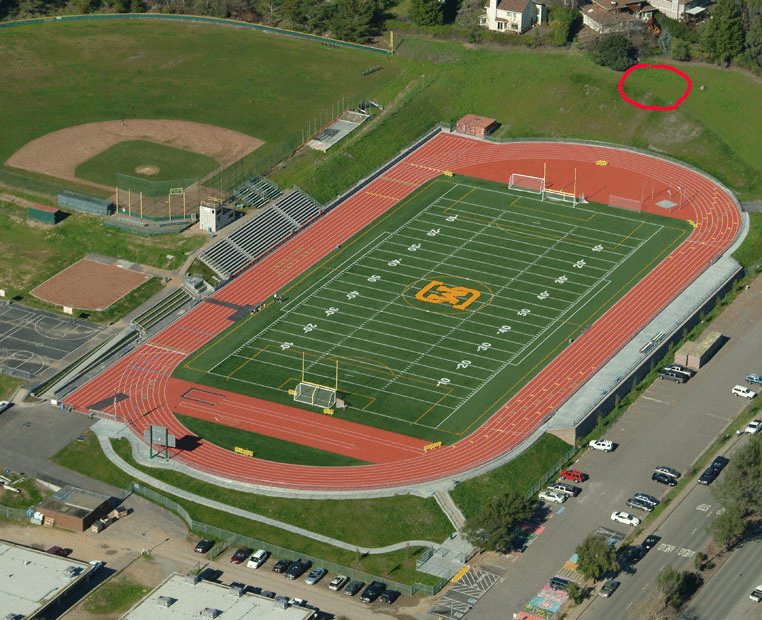
Site Selection: My group was tasked to find an ideal place to build a theoretical second solar studio. We checked out three areas. The first was very close to the original solar studio , just moved about 300 feet towards the softball field. I provided all the benefits the original had, but also the downsides. So, we kept moving. The second site we looked at was just outside the softball field fence. I had good sun for most of the day but mid afternoon due to a giant tree. It also was at VERY high risk of being hit with a softball and was too close to the street. Our third choice ( and the one we stayed with) was behind the football field. It was located up on the hill behind the goal post furthest from the main school. Here sun was prevalent at almost all times of the day. It was near homes, but separated by a good amount of land (50 feet) and had minimal street noise being so far from the road.
|
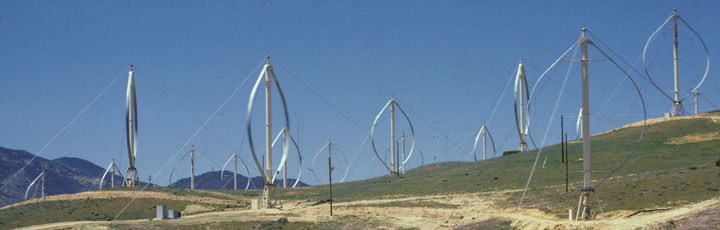
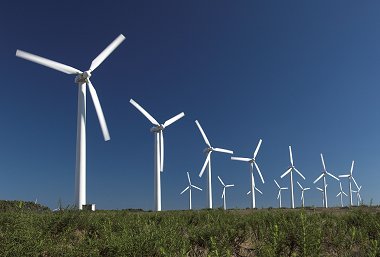
Wind Turbine Lab:
VAWT: Vertical Axis Wind Turbine, they spin on a vertical axis like so: HAWT: Horizontal Axis Wind Turbine, they spin on a horizontal axis like so: For this lab groups were instructed to design a fan. Not a fan to create wind, but receive wind and convert it into energy. We were given a list of tips and facts about these types of fans, as well as examples of real life turbines and how they functioned. For HAWTS (Horizontal Turbine, most common) my group designed a turbine with three blades, we did this because that is what is most common in the industry. This told us it would most likely be the most efficient. Our blades were shaped like rectangles that had been thinned towards the inner part and thickened on the edge as seen below |
|

For our VAWT ( Vertical turbine) We designed a fan that had 8 fans on it all very close to each other, almost over lapping. They were shorter than the ones above but also had the similarity of having a slightly thinner inner area. They also included small cuts on the same side of every fan to cause it to push more in the direction we wanted it to turn.

Both of our HAWT and VAWT designs were very successful. Our HAWT averaged about 2.1 volts of power on a medium setting. Our VAWT also averaged very high at around 2 volts of power. These numbers are both very good for the setting we were at. As we turned down the fan though, we decreased by our average by about a volt on both HAWT and VAWTs. As we turned the fan (or leaf blower for high setting) up we were under the impression we would get extraordinary numbers. But instead our feeble paper designs could not handle the wind and did not improve very much at all.
Justification paper:
This was a Google doc shared by the whole class teaching about the effects and causes of climate change to go along with our
unit.
I have the link pasted above if you wish to read all about the topics discussed
This was a Google doc shared by the whole class teaching about the effects and causes of climate change to go along with our
unit.
I have the link pasted above if you wish to read all about the topics discussed
| energy_sources_justification_-_6_7_period_2015.gdoc |
Cold frame design: My group had an extremely unique design for our cold frame. It was set up with a triangular prism-like structure as seen here
What is a cold frame? :
A transparent-roofed enclosure, built low to the ground, used to protect plants from adverse weather, primarily excessive cold or wet. The transparent top admits sunlight and prevents heat escape via convection that would otherwise occur, particularly at night. Essentially, a cold frame functions as a miniature greenhouse to extend the growing season.[1] (www.wikipedia.com)
Our Design: We created a cold frame with sides as right triangles. The face of it was completely clear. We painted the inside maroon. This is because plants need this light to grow, and painting it the color it needs to grow and have lots of heat will make sure only light of those wavelengths are reflected on the plant. Another very unique thing about our design is that instead of using soil, we use hydroponics to grow our plants.
Hydroponics: a subset of hydroculture and is a method of growing plants using mineral nutrient solutions, in water, without soil. Terrestrial plants may be grown with their roots in the mineral nutrient solution only or in an inert medium, such as perlite or gravel. (www.wikipedia.com)
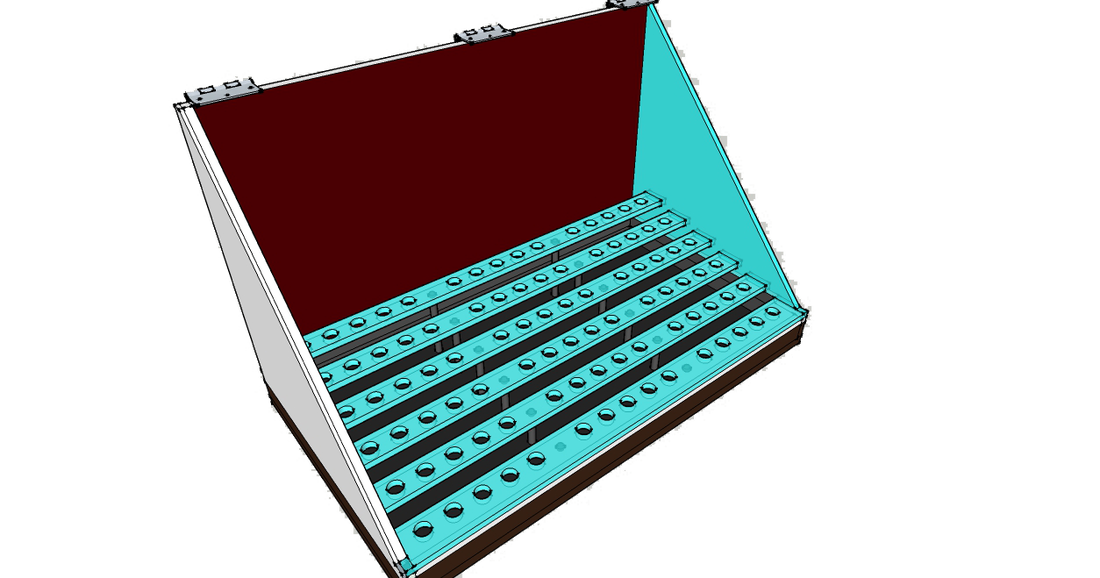
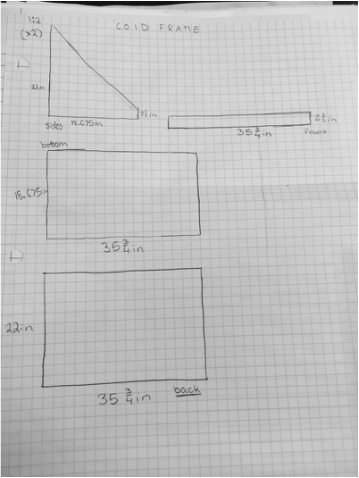
Here you can see our measurements and dimensions for the cold frame As well as the 3D model for our cold frame. In the model you will see all the coloring strategy's being used as well as how we held our plants in the water. We had the plants sit in holes held in by string. The smaller seeds sat on coffee filters.
North Window Design: Last year the stem class of 2017 built a solar home. They had a very good design, but one fault. The window facing to the north was useless, not taking in any light. Our job this year was too find a solution too that.
My group decided on a simple idea. Our plan was to place 5 mirrors around the back of the solar home. They would all be angled to shine sun directly into the open window. On the inside of the window we planned to put a diffusion curtain to make the direct reflection coming in a dispersed so that it could spread through the house.
My group decided on a simple idea. Our plan was to place 5 mirrors around the back of the solar home. They would all be angled to shine sun directly into the open window. On the inside of the window we planned to put a diffusion curtain to make the direct reflection coming in a dispersed so that it could spread through the house.
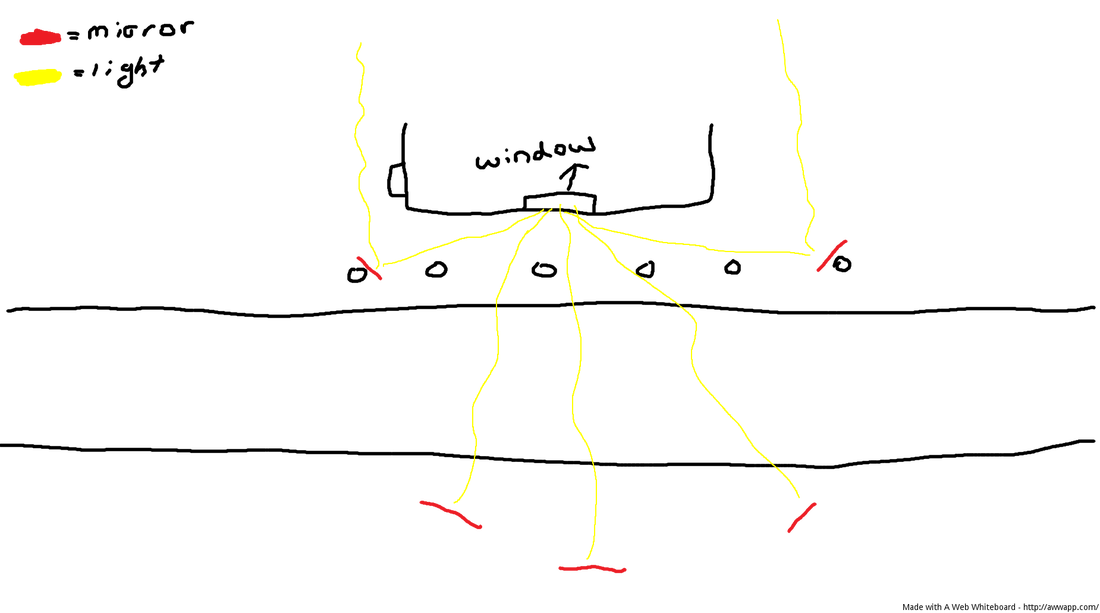
here we have our placement for the mirrors.
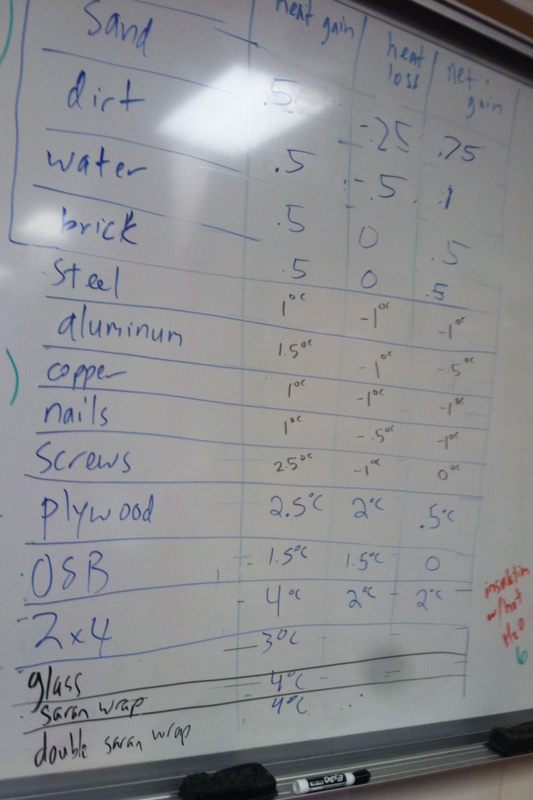
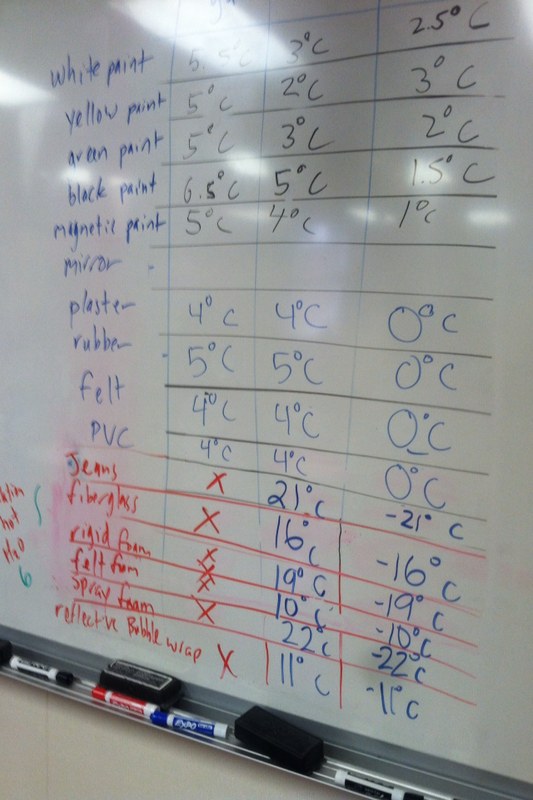
Materials Testing Lab: For a few days during this unit we did labs testing materials. During these labs we put various types of materials under heat lamps next to each other and took heat measurements every 4 minutes. The purpose was to distinguish which materials got heat fast but also let it go fast, and the kind that got heat and kept it for a long time.
Here are the numbers we collected for all the materials.
Here are the numbers we collected for all the materials.
Concepts:
Heat - energy in a transfer
Temperature - a comparative measure of hot and cold
0th law of thermodynamics - If two thermodynamic systems are each in thermal equilibrium with a third, then they are in thermal equilibrium with each other.
1st law of thermodynamics - matter and energy are conserved
2nd law of thermodynamics - entropy always increases
3rd law of thermodynamics - absolute zero is unattainable
Conduction - transfer of heat through solids
Convection - transfer of heat through fluid
Radiation - transfer of heat through waves
Specific heat - the quantity of required to raise the temperature of a unit mass of a substance by one degree Celsius
Pressure - force over an area
Ideal gas law - any change in internal energy results in a change in temperature. PV = nRT
Boyle's law - pressure and volume are indirectly related. P1 * V1 = P2 * V2
Bernoulli's principle - Fluid pressure decreases as pressure increases
Archimedes principle - an immersed object is buoyed up by as force equal to the weight of its displaced fluid
Insulation - inability to transfer heat
Solid - state of matter with very little particle movement
Liquid - state of matter that can flow but not float
Gas - state of matter which can flow and float
Buoyancy - weight of water from displacement
Reflection: This project was FULL of pits, but also had many peaks too. Our solar water heater started off good and continued well, we did not have any pits until one thing happened.. We spilled about half of our water loosing all of our heat. This ruined the results of our project. Next, our daylight housing. This went very well for the most part. One pit we had was with out hallway and getting light into that and into the rooms next to it. For our wind turbine lab we started off very cold. Our pit was trying to find a design for our blades, nothing looked good or worth trying. Then we had a peak when we found a design from another group and modified it, It worked well. Our cold frame went very well also. Like any project we had pits and peaks though. We struggled for a long time on finding a way to hold plants in our hydroponics system. Another issue we had was with finding a color to paint the inside of the cold frame. We could not decide between white or black. That was one of our peaks though, finding the correct color. After Enough thinking our group came up with an idea to paint it maroon to generate the most plant growing sun in cold frame.
In the end I learned A LOT from this project. Not just from the physical part, but from all the side labs we did about heat dynamics and behaviors. I learned that with all the time given too us, it is very easy to procrastinate and not work well until the very end. I also learned that when not pressed with something to do, me personally, I do not try hard enough to find something to do. Some things I definitely could have done better would be work efficiency/ time management. I know that I say this in almost every project, but it is something I still haven't mastered. The second thing I need to work on is leadership in my group. I need to take action more and be more proactive instead of just listening. I will work on these in future projects.
In the end I learned A LOT from this project. Not just from the physical part, but from all the side labs we did about heat dynamics and behaviors. I learned that with all the time given too us, it is very easy to procrastinate and not work well until the very end. I also learned that when not pressed with something to do, me personally, I do not try hard enough to find something to do. Some things I definitely could have done better would be work efficiency/ time management. I know that I say this in almost every project, but it is something I still haven't mastered. The second thing I need to work on is leadership in my group. I need to take action more and be more proactive instead of just listening. I will work on these in future projects.
